It is possible to bind an Exchange to another Exchange just like Exchanges to Queues bindings. An exchange can be bound with another exchange with the source routing rules. The destination exchange finally routes the messages to the Queues bound to it.
We will take 2 Exchanges as an example, home-direct-exchange as source and linked-direct-exchange as the destination exchange. The destination exchange is bound to the source exchange with the routing key homeAppliance. As you can see in the diagram, each of these exchanges is linked to several Queues. We will learn what happens when we send a message to home-direct-exchange.
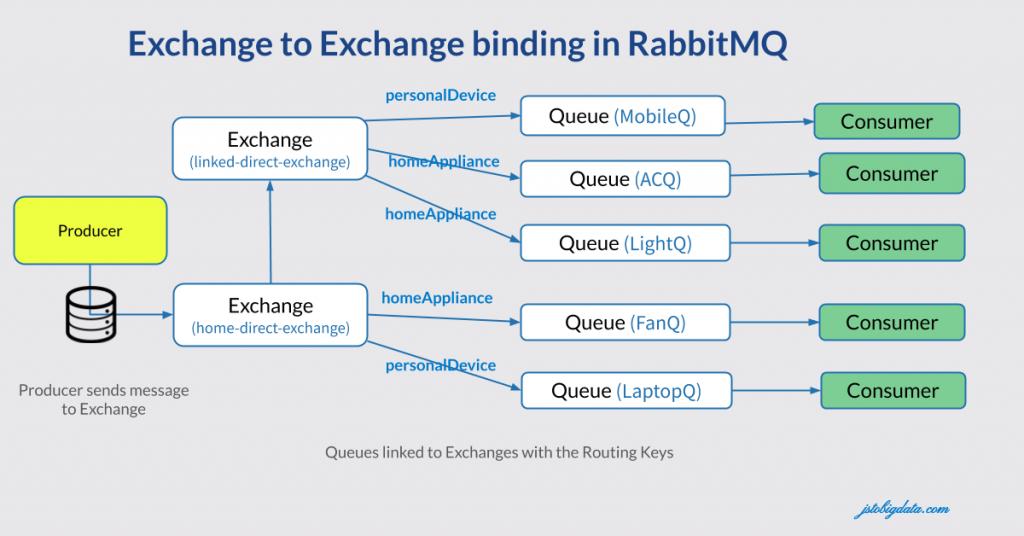
Message routing in Exchange-to-Exchange bindings
- A producer sends a message to the source exchange, optionally with a routing key based on the type of Exchange. In this case, the message producer sends a message to
home-direct-exchange. - There are 2 Queues (FanQ, LaptopQ) linked to the source exchange with
homeApplianceandpersonalDeviceas the routing key. Also, the destination Exchangelinked-direct-exchangeis linked to the source exchange with a routing key (sayhomeAppliance). - Now, if the message sent to source exchange has the routing key
homeAppliance, it will be routed toFanQand thelinked-direct-exchange. - This message will further forwarded to
ACQandLightQas both these Queues are also linked to thelinked-direct-exchangewithhomeAppliancerouting key. - This is how a message sent to the source exchange arrives on multiple Queues linked to multiple Exchanges.
Implement an Exchange-to-Exchange binding in AMQP
We will now implement the above-discussed example. Let us go step by step, you may skip some of the steps as they of a repeat of the previous articles.
Step-1
Create an instance of the Connection class as a singleton object if you have not done it yet. It is safe to share the same single instance of the Connection object and that is the recommended approach.
package com.amqp.exchanges.all;

import com.rabbitmq.client.Connection;
import com.rabbitmq.client.ConnectionFactory;

import java.io.IOException;
import java.util.concurrent.TimeoutException;

public class ConnectionManager {
  private static Connection connection = null;

  public static Connection getConnection() {
    if (connection == null) {
      try {
        ConnectionFactory connectionFactory = new ConnectionFactory();
        connection = connectionFactory.newConnection("amqp://guest:guest@localhost:5672/");
      } catch (IOException | TimeoutException e) {
        e.printStackTrace();
      }
    }
    return connection;
  }
}
Step-2
Declare the two Direct Exchange with the name home-direct-exchange and linked-direct-exchange. We will make use of the Channel.exchangeDeclare method as shown below. Create a class as ExchangeToExchange and add the below code as a method in it.
  //Declare the exchanges
  public static void declareExchanges() throws IOException, TimeoutException {
    Channel channel = ConnectionManager.getConnection().createChannel();

    //Declare both the exchanges - linked-direct-exchange and home-direct-exchange.
    channel.exchangeDeclare("linked-direct-exchange", BuiltinExchangeType.DIRECT, true);
    channel.exchangeDeclare("home-direct-exchange", BuiltinExchangeType.DIRECT, true);
    channel.close();
  }
Step-3
Declare the Queues used in this example. We will create 5 Queues (MobileQ, ACQ, LightQ, FanQ, and LaptopQ). These Queues will be linked later to their respective Exchanges.
  //Declare the Queues
  public static void declareQueues() throws IOException, TimeoutException {

    //Create a channel - do not share the Channel instance
    Channel channel = ConnectionManager.getConnection().createChannel();

    //Create the Queues for linked-direct-exchange
    channel.queueDeclare("MobileQ", true, false, false, null);
    channel.queueDeclare("ACQ", true, false, false, null);
    channel.queueDeclare("LightQ", true, false, false, null);

    //Create the Queues for home-direct-exchange
    channel.queueDeclare("FanQ", true, false, false, null);
    channel.queueDeclare("LaptopQ", true, false, false, null);
    channel.close();
  }
Step-4
Now link the Queues to respective Exchanges. We will link MobileQ, ACQ and LightQ to linked-direct-exchange. Similarly, link the LaptopQ, FanQ to home-direct-exchange. Note there are 3 queues linked with routing key homeAppliance.
  //Create the Bindings  between respective Queues and Exchanges
  public static void declareQueueBindings() throws IOException, TimeoutException {
    Channel channel = ConnectionManager.getConnection().createChannel();

    //Create bindings - (queue, exchange, routingKey)
    channel.queueBind("MobileQ", "linked-direct-exchange", "personalDevice");
    channel.queueBind("ACQ", "linked-direct-exchange", "homeAppliance");
    channel.queueBind("LightQ", "linked-direct-exchange", "homeAppliance");

    //Create the bindings - with home-direct-exchange
    channel.queueBind("FanQ", "home-direct-exchange", "homeAppliance");
    channel.queueBind("LaptopQ", "home-direct-exchange", "personalDevice");
    channel.close();
  }
Step-5
Now it is time to bind the 2 exchanges, note a destination exchange is bound with the source exchange with the source-exchange routing rules.
  //Create the Bindings between Exchanges.
  public static void declareExchangesBindings() throws IOException, TimeoutException {
    Channel channel = ConnectionManager.getConnection().createChannel();

    //                   (destination-exchange, source-exchange , routingKey
    channel.exchangeBind("linked-direct-exchange", "home-direct-exchange", "homeAppliance");
    channel.close();
  }
Step-6
Create the code to subscribe to the Queues. You can optimize the below code, this is just for example purpose.
  // Create the Subscribers
  public static void subscribeMessage() throws IOException, TimeoutException {
    Channel channel = ConnectionManager.getConnection().createChannel();

    channel.basicConsume("MobileQ", true, (consumerTag, message) -> {
      System.out.println("\n\n" + message.getEnvelope());
      System.out.println("MobileQ:" + new String(message.getBody()));
    }, consumerTag -> {
      System.out.println(consumerTag);
    });

    channel.basicConsume("ACQ", true, (consumerTag, message) -> {
      System.out.println("\n\n" + message.getEnvelope());
      System.out.println("ACQ:" + new String(message.getBody()));
    }, consumerTag -> {
      System.out.println(consumerTag);
    });

    channel.basicConsume("LightQ", true, (consumerTag, message) -> {
      System.out.println("\n\n" + message.getEnvelope());
      System.out.println("LightQ:" + new String(message.getBody()));
    }, consumerTag -> {
      System.out.println(consumerTag);
    });

    channel.basicConsume("LaptopQ", true, (consumerTag, message) -> {
      System.out.println("\n\n" + message.getEnvelope());
      System.out.println("LaptopQ:" + new String(message.getBody()));
    }, consumerTag -> {
      System.out.println(consumerTag);
    });

    channel.basicConsume("FanQ", true, (consumerTag, message) -> {
      System.out.println("\n\n" + message.getEnvelope());
      System.out.println("FanQ:" + new String(message.getBody()));
    }, consumerTag -> {
      System.out.println(consumerTag);
    });
  }
Step-7
We will now publish a message to home-direct-exchange with the routing key homeAppliance. Idea is to send a message to this source exchange, it should arrive at the destination exchange as well.
  public static void publishMessage() throws IOException, TimeoutException {
    Channel channel = ConnectionManager.getConnection().createChannel();
    String message = "Direct message - Turn on the Home Appliances ";
    channel.basicPublish("home-direct-exchange", "homeAppliance", null, message.getBytes());
    channel.close();
  }
Step-8
Finally, we will call all the above methods inside the public static void main. There are 2 threads created to run the message publish and subscribe asynchronously.
  public static void main(String[] args) throws IOException, TimeoutException {
    ExchangeToExchange.declareExchanges();
    ExchangeToExchange.declareQueues();
    ExchangeToExchange.declareQueueBindings();
    ExchangeToExchange.declareExchangesBindings();

    //Threads created to publish-subscribe asynchronously
    Thread subscribe = new Thread() {
      @Override
      public void run() {
        try {
          ExchangeToExchange.subscribeMessage();
        } catch (IOException | TimeoutException e) {
          e.printStackTrace();
        }
      }
    };

    Thread publish = new Thread() {
      @Override
      public void run() {
        try {
          ExchangeToExchange.publishMessage();
        } catch (IOException | TimeoutException e) {
          e.printStackTrace();
        }
      }
    };

    subscribe.start();
    publish.start();
  }
Output:
Envelope(deliveryTag=1, redeliver=false, exchange=home-direct-exchange, routingKey=homeAppliance)
ACQ:Direct message - Turn on the Home Appliances


Envelope(deliveryTag=2, redeliver=false, exchange=home-direct-exchange, routingKey=homeAppliance)
LightQ:Direct message - Turn on the Home Appliances


Envelope(deliveryTag=3, redeliver=false, exchange=home-direct-exchange, routingKey=homeAppliance)
FanQ:Direct message - Turn on the Home Appliances
As you can see in the output, the source exchange routes the message with routingkey homeAppliance to linked-direct-exchange as well as the FanQ. The destination exchange also forwards the message to LightQ and ACQ.
Conclusion:
It is possible to apply the same set of routing protocols like Direct Exchange, Topic Exchange, Fanout Exchange, and Headers Exchange routings to Exchange-to-Exchange bindings. I would love to hear your feedback on the article below.