In this quick tutorial, we are going to see how we can set up a JUnit 5 project. It will cover the download and installation part with a small working example.
Prerequisite
To set up a JUnit 5 project, you will need the followings:
- Java 8 (or higher)
- Maven 3.0 (or higher)
- Your favorite IDE (I’m using IntelliJ IDEA)
I’m using Java 14.0.1, Maven 3.6.3, IntelliJ IDEA 2020.2 Community Edition.
Setting up the JUnit 5 project
I’m creating a Spring Boot project. As the Spring Boot is getting popular, there is more chance that you would want to use JUnit 5 with Spring Boot in your application. To create a Spring Boot project, I’ve used Spring Initializr. And to do the same, you may use this link directly. Download the archive, extract and import into your favorite IDE.
Instead of using spring-boot-starter-test I’m going to use junit-jupiter for the initial learning purpose. Once you get some hands-on examples running in JUnit 5, you can use spring-boot-starter-test without much difference. spring-boot-starter-test internally uses Jupiter.
So now your pom.xml should look something like this:
<?xml version="1.0" encoding="UTF-8"?>
<project xmlns="http://maven.apache.org/POM/4.0.0" xmlns:xsi="http://www.w3.org/2001/XMLSchema-instance"
  xsi:schemaLocation="http://maven.apache.org/POM/4.0.0 https://maven.apache.org/xsd/maven-4.0.0.xsd">
  <modelVersion>4.0.0</modelVersion>
  <parent>
     <groupId>org.springframework.boot</groupId>
     <artifactId>spring-boot-starter-parent</artifactId>
     <version>2.3.2.RELEASE</version>
     <relativePath/> <!-- lookup parent from repository -->
  </parent>
  <groupId>com.jstobigdata</groupId>
  <artifactId>junit-tutorial</artifactId>
  <version>0.0.1-SNAPSHOT</version>
  <name>junit-tutorial</name>
  <description>JUnit 5 tutorial</description>

  <properties>
     <java.version>14</java.version>
     <junit.jupiter.version>5.6.2</junit.jupiter.version>
  </properties>

  <dependencies>
     <dependency>
        <groupId>org.springframework.boot</groupId>
        <artifactId>spring-boot-starter</artifactId>
     </dependency>

     <dependency>
        <groupId>org.junit.jupiter</groupId>
        <artifactId>junit-jupiter</artifactId>
        <version>${junit.jupiter.version}</version>
        <scope>test</scope>
     </dependency>
  </dependencies>

  <build>
     <plugins>
        <plugin>
           <groupId>org.springframework.boot</groupId>
           <artifactId>spring-boot-maven-plugin</artifactId>
        </plugin>
     </plugins>
  </build>

</project>
You might notice here that we need only Jupiter API out of the JUnit 5 architecture. To know more, you can read our tutorial on Introduction to JUnit 5.
Now, navigate to src/test/java/junittutorial/ and Edit the JunitToutorialApplication.java like below:
package com.jstobigdata.junittutoral;

import org.junit.jupiter.api.Assertions;
import org.junit.jupiter.api.Test;

class JunitTutorialApplicationTests {


  @Test
  void contextLoads() {
     System.out.println("Hello JUnit");
  }

  @Test
  void testIsEqual(){
     Assertions.assertEquals(2, 2);
  }

}
You are all done to run your first test case in JUnit 5 with Spring Boot.
Running the first test case in JUnit 5
To run, type mvn clean test into the terminal.
You will see the output similar to following:
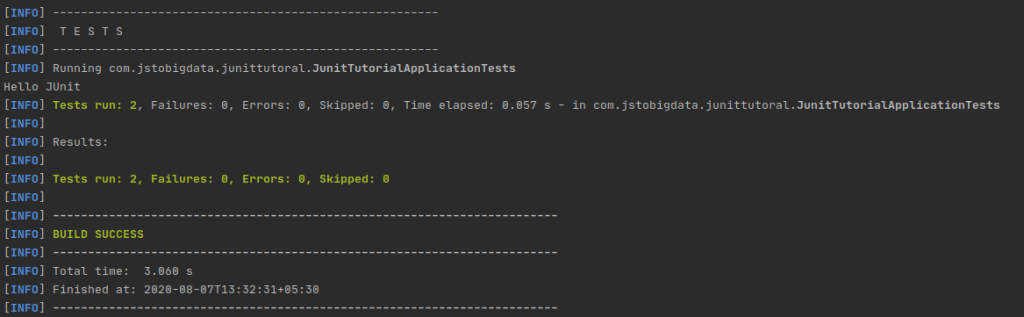
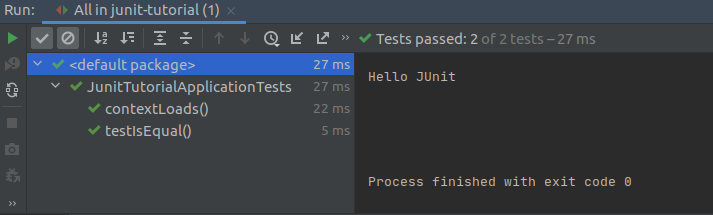
mavenYou can also use your IDE’s feature to run test cases. In case of IntelliJ, right-click on the project/module and click on the option to `Run ‘All Tests’`
You will notice the output like this:
Excercise
It is always a good habit to do some exercise on your own for whatever new thing you have learned. So here’s some exercise you can try and observe the output to get more familiar with JUnit and software testing. You can add these methods to the test class and run.
@Test
void testStringEqual(){
  var expected = "jstobigdata";
  var actual = "jstobigdata";
  Assertions.assertEquals(expected, actual);
}

@Test
void testBoolean(){
  var expected = "jstobigdata"; // reference from pool
  var actual = new String(expected); // reference from Heap
  Assertions.assertTrue(expected == actual);
}

@Test
void testObjectEqual(){
  var expected = "jstobigdata"; // reference from pool
  var actual = new String(expected); // reference from Heap
  Assertions.assertEquals(expected, actual);
}
Conclusion
So today we learned about how to set up JUnit 5 with a Spring Boot project. We also saw a running example and got some exercises to practice. If you are facing any setup issue or if test cases are not executing, hit me in the comments. I would get back to you. You can also post the exercise results in the comments section as well.