You will understand JMS Architecture, learn to Send and Receive a message in JMS. I will cover, Administrated Objects, JMS 1.1 API and JMS 2.0 API. We will also see how simple is JMS 2.0 API to use as compared to JMS 1.1 API. Make sure you have the JMS set up completed before proceeding with the course. If you are a beginner, make sure you have understood the basics of JMS.
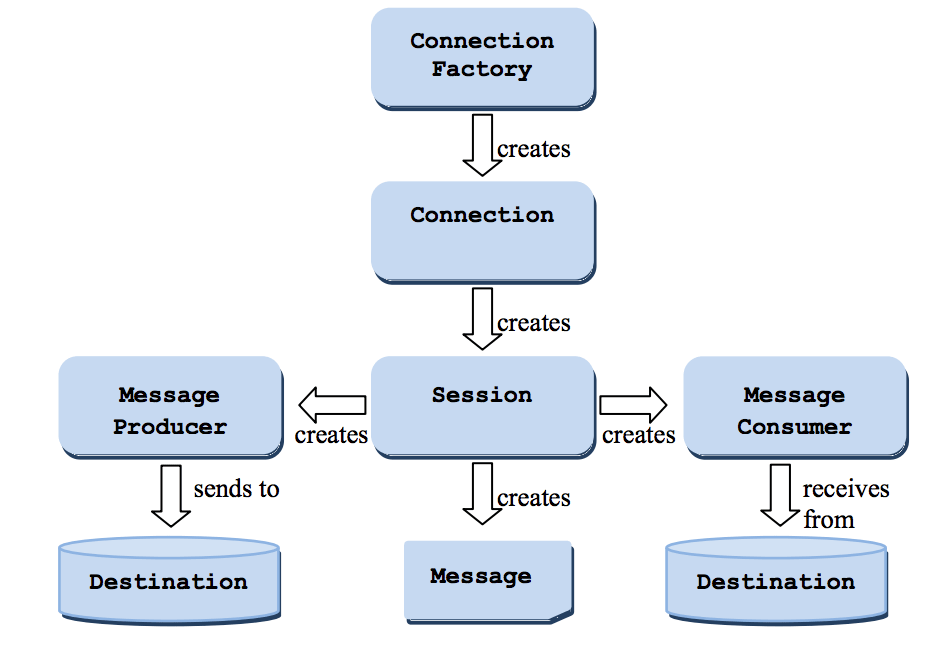
- Remember when you work in JMS, the ConnectionFactory and Destination objects (Queue and Topics) are needed to be configured in the JMS providers. This is the reason why they are known as Administered objects.
- You will usually do a JNDI lookup to get a ConnectionFactory and then obtain a physical Connection object from the ConnectionFactory.
- After obtaining a Connection, you will need to open up a Session to send/receive messages.
JMS APIs Version
There are basically 2 main sets of interface for sending and receiving the messages that you need to learn.
- JMS 1.1 – Also known as Classic API, this is the legacy API.
- JMS 2.0 – Known as Simplified API, offers simpler API needs fewer interfaces. This is what you need to use in new projects.
Common interfaces
- Queue – An administered object used for point-to-point messaging. Single producer and a single receiver.
- Topic – an administered object used for pub/sub messaging. Single Producer, but multiple Receiver.
- Destination – The common supertype of Queue and Topic.
- Message, ByteMessage, MapMessage, ObjectMessage, StreamMessage and StreamMessage – Represents the message’s type that is sent to or received from a JMS provider.
Send and receive a message using JMS
We will see simple examples to send and receive a text message using JMS 1.1 (classic API) and also using JMS 2.0 (simplified API). I recommend using the JMS 2.0 API, this is what will be discussed more in this tutorial. However, it is also a good idea to keep an eye on the Old API if you happen to work on a legacy application.
Developing a client in JMS 1.1
Below is a sample example that demonstrates the use of classic API. It creates a simple text message and sends it to a Queue. The same message is then read by a message consumer from the same queue.
package lab00.classic.helloworld;

import javax.jms.*;
import javax.naming.InitialContext;
import javax.naming.NamingException;

public class TestHelloWorldQueue {
  public static void main(String[] args) throws NamingException {
    InitialContext initialContext = null;

    try {
      initialContext = new InitialContext();

      //Step-1 Create ConnectionFactory
      ConnectionFactory connectionFactory
          = (ConnectionFactory) initialContext.lookup("jms/__defaultConnectionFactory");

      //Step-2 Create connection
      Connection connection = connectionFactory.createConnection();

      //Step-3 Create Session
      //Any number of sessions can be created from a connection
      Session session = connection.createSession();

      //Step-4 Get the Queue
      Queue queue = (Queue) initialContext.lookup("jms/PTPQueue");

      //Step-5a Create the message Producer
      MessageProducer messageProducer = session.createProducer(queue);

      //Step-6a Create the Text Message
      TextMessage textMessage = session.createTextMessage("Test message - Hello");

      //Step-7a Send the message
      messageProducer.send(textMessage);

      //Step-5b Create the message consumer
      MessageConsumer messageConsumer = session.createConsumer(queue);

      //Step-6b Start the connection
      connection.start(); //to start delivery

      //step-7b Receive the message
      TextMessage message = (TextMessage) messageConsumer.receive();
      System.out.println(message.getText());
    } catch (NamingException | JMSException ex) {
      ex.printStackTrace();
    } finally {
      if (initialContext != null) {
        initialContext.close();
      }
    }
  }
}
As you can see in the above code, there are several steps you need to follow to send and receive a message using JMS 1.1 (classic api). Summarizing the steps below.
- Create the
ConnectionFactoryusing JNDI lookup. The JNDI information is configured injndi.propertiesfile. You will need only one ConnectionFactory per applicaton/service. - After that, get the
Connectionobject from the ConnectionFactory. - Create a
Sessionfrom the connection. - Use the Session to create
MessageProducerandMessageConsumerobjects. - Tell the Connection to start delivering the message.
- Most importantly, remember to close the Session, Connection, MessageProducer, and MessageConsumer objects in a finally-block or in a try-with-resources block. I have just skipped this step for brevity.
The below diagram represents the above steps as a flow chart.
Developing a client in JMS 2.0
I will do the same task of sending a hello message to the Queue and reading it using a Consumer. Let us take a look at the below code. Note, the example below is only to give you an idea of JMS 2.0. Don’t code the same way in your project, in the latter part of the tutorial I will be discussing more Project appropriate code examples.
package lab00.simple.helloworld;

import javax.jms.*;
import javax.naming.InitialContext;
import javax.naming.NamingException;

public class TestHelloWorld {
  public static void main(String[] args) {
    ConnectionFactory connectionFactory = null;
    Queue queue = null;

    try {
      InitialContext initialContext = new InitialContext();

      //Step-1 Create ConnectionFactory
      connectionFactory
          = (ConnectionFactory) initialContext.lookup("jms/__defaultConnectionFactory");

      //Step-2
      queue = (Queue) initialContext.lookup("jms/PTPQueue");
    } catch (NamingException e) {
      e.printStackTrace();
    }

    //Step-3
    try (JMSContext jmsContext = connectionFactory.createContext()) {

      //Step-4a
      TextMessage textMessage = jmsContext.createTextMessage("Message using JMS 2.0");
      JMSProducer jmsProducer = jmsContext.createProducer().send(queue, textMessage);

      //Step-4b
      TextMessage message = (TextMessage) jmsContext.createConsumer(queue).receive();
      System.out.println(message.getText());
    } catch (JMSException e) {
      e.printStackTrace();
    }
  }
}
I think the steps used to send and receive the message are self-explanatory.
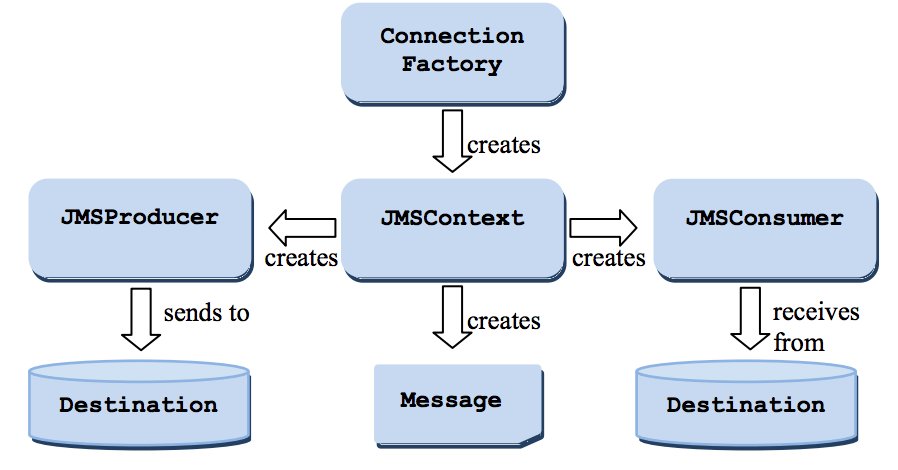
- Obtain the
ConnectionFactory. No need to create Connection and Session unlike Classic API. - Obtain the
Destination, in this example it isQueuefrom InitialContext. - Create a
JMSContextfrom connectionFactory. - Use the
JMSProducerto send a message to the Messaging Server. - Similarly, use the
JMSConsumerto receive a message from JMS.
The below image is from the official JMS 2.0 specification doc.
Thread safety of JMS API
When you write code using JMS API, it is important to understand the thread safety (multi-threading) behavior of the interfaces. The below table represents the same.
| API 2.0 JMS Object | Thread Safety (Allows concurrent use) |
| Destination (Queue, Topic) | Yes |
| ConnectionFactory | Yes |
| JMSContext | No |
| JMSProducer | No |
| JMSConsumer | No |
| JMS 1.1 Objects | Thread Safety (Allows concurrent use) |
| Destination (Queue, Topic) | Yes |
| ConnectionFactory | Yes |
| Connection | Yes |
| Session | No |
| MessageProducer | No |
| MessageConsumer | No |
Remember, henceforth we will be focusing on the JMS 2.0 API. This is all as part of the Getting started tutorial where you learned to Send and Receive a message in JMS Queue. We will explore several other topics in the next tutorials. Please share your feedback on this tutorial in the comments below.