In this tutorial, we will learn the different elements of AMQP to work with RabbitMQ. I have already talked about the basics of RabbitMQ in the previous introduction article. Lets first learn the basics components of any messaging system and then we will get into the elements of AMQP.
Basic components of a Messaging system
Any messaging system is made up of 4 important components, Message Producers, Message Consumers, Message Brokers, and the message itself.
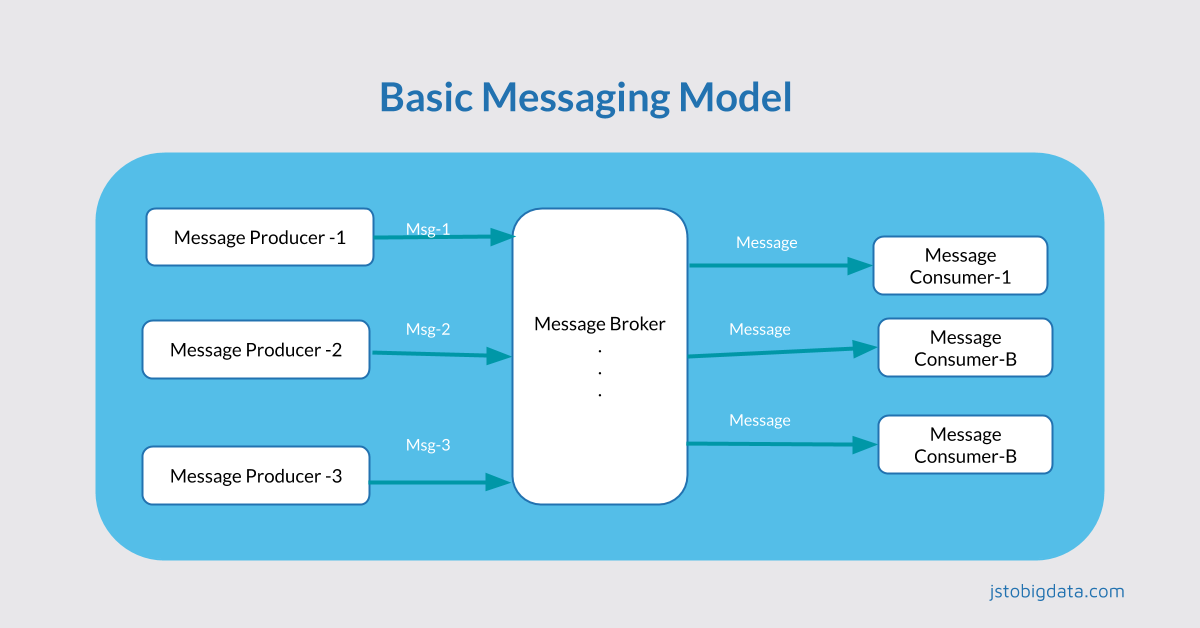
Message Producers are the source of messages. It sends messages to specific destinations such as Queue or Topics which is then consumed by the subscribers.
Message Consumers are the subscribers that receive/read the published messages and processes it.
Message Brokers are the servers like ActiveMQ, RabbitMQ which does the heavy lifting such as routing the messages to the right destination, ensuring its delivery and durabilities and so on. Brokers are the middleware between producers and consumers. This is the reason why it is often referred to as Message Oriented Middleware. A message broker can have further components like Queues, Topics, Exchanges etc depending on the vendors.
Messages are the main reason why messaging architecture exists, it is the actual content with headers and metadata. The message body (content) can contain binary, JSON, XML, plain text type and etc data.
Elements of the AMQP system
AMQP stands for Advanced Message Queuing Protocol, it creates the interoperability between Producer, Message Broker, and the Consumer. Just like any messaging system, a producer/publisher creates a message and sends the message to an Exchange. Then the Exchange routes the message to one or more Queues depending upon the related Bindings.
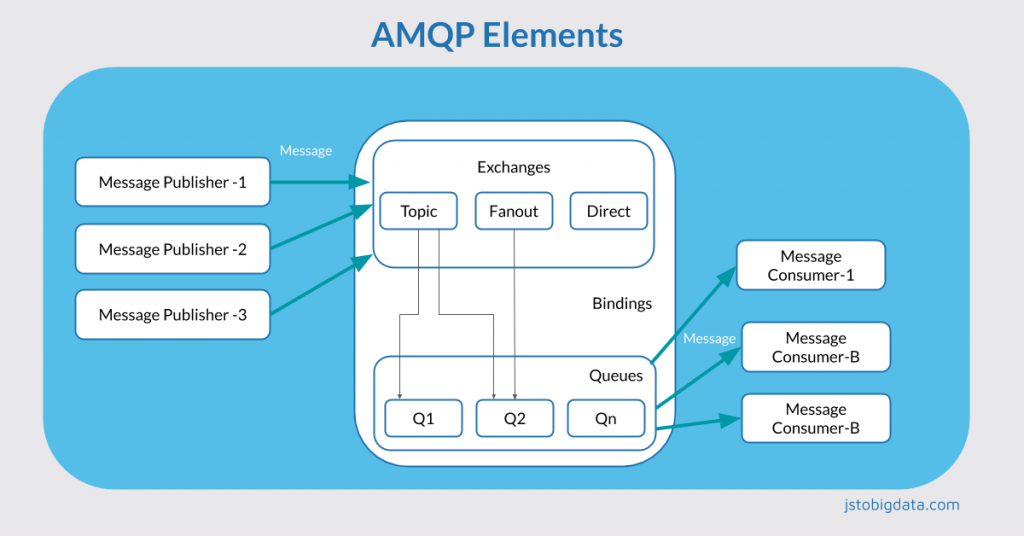
Publisher – It is typically an AMQP client application that generates messages and forwards them to AMQP Exchanges. A publisher/producer can be written in any programming language as the protocol is language independent.
Message – It is produced by the publishers and has all the necessary information such as source, headers, properties, and routing information, etc.
Subscriber – It is also an AMQP client application that receives the message and sends Acknowledgement to the message broker. It is also called as Consumer.
Message Broker – This is the middleware server that is responsible for delivering messages to the right destination. The message broker consists of exchanges and Queues.
Message Exchange – An Exchange receives a message from the producer, routes to the right Queues depending upon the binding.
Message Queue – A Queue receives the message from the exchanges and sends it to the consumer. If the consumer is not ready to receive, it stores the message in disk/memory.
Connection – It is a TCP connection between the client application and the RabbitMQ broker.
Channel – It is a virtual connection inside a connection. When a Queue/Exchange is declared, deleted, or a message is published or consumed, it is done over Channel.
Binding – Link between a Queue and an Exchange.
Routing Key – Based on the routing keys, exchange decides how to route the message to a Queue. It is like a destination address.
VHost – Virtual host is like the apache virtual host, it allows segregated virtual environments based on the application needs.
We will look into each of these individual elements a little later in this tutorial. For now, let us just remember the important components.
Send and Receive a message in RabbitMQ
Step – 1) Create a queue with the name Queue-1 from the management UI.
You need to have the RabbitMQ server running to try this example out. Login to the RabbitMQ management UI and create a queue with the name Queue-1. The default username and password to login is guest.
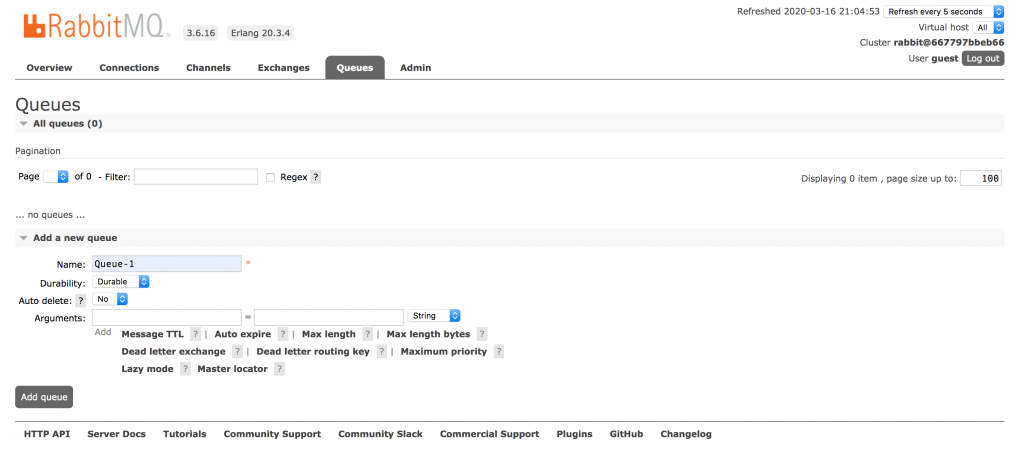
As shown above, add the name as Queue-1, Durability as Durable and click on Add Queue. Once the Queue is created we will publish a couple of messages and consume it in java using the amqp-client library.
Step – 2) Create a maven project
Create a maven project and add the amqp-client dependency in pom.xml as shown below.
<dependency>
    <groupId>com.rabbitmq</groupId>
    <artifactId>amqp-client</artifactId>
    <version>5.8.0</version>
</dependency>
Step-3) Write the necessary code and run them as shown below.
In the example below, the class CommonConfigs contains information like Queue name and RabbitMQ server URL. The subscriber listens to the queue and prints the messages as soon as it receives them. Try to run the consumer first and then the producer code example, another way around should also just work fine.
package com.amqp.basic.queue;

import com.rabbitmq.client.Channel;
import com.rabbitmq.client.Connection;
import com.rabbitmq.client.ConnectionFactory;

public class MessagePublisher {
  public static void main(String[] args) throws Exception {

    ConnectionFactory factory = new ConnectionFactory();
    Connection connection = factory.newConnection(CommonConfigs.AMQP_URL);
    Channel channel = connection.createChannel();
    for (int i = 0; i < 4; i++) {
      String message = "Getting started with rabbitMQ - Msg" + i;
      channel.basicPublish("", CommonConfigs.DEFAULT_QUEUE, null, message.getBytes());
    }
    channel.close();
    connection.close();
  }
}
package com.amqp.basic.queue;

import com.rabbitmq.client.*;
import java.io.IOException;
import java.util.concurrent.TimeoutException;

public class MessageSubscriber {
  public static void main(String[] args) throws IOException, TimeoutException {

    ConnectionFactory factory = new ConnectionFactory();
    Connection connection = factory.newConnection(CommonConfigs.AMQP_URL);
    Channel channel = connection.createChannel();
    DeliverCallback deliverCallback = (s, delivery) -> {
      System.out.println(new String(delivery.getBody()));
    };
    CancelCallback cancelCallback = s -> {
      System.out.println(s);
    };
    channel.basicConsume(CommonConfigs.DEFAULT_QUEUE, true, deliverCallback, cancelCallback);
  }
}
package com.amqp.basic.queue;

public class CommonConfigs {
  public static final String DEFAULT_QUEUE = "Queue-1";
  public static final String AMQP_URL = "amqp://guest:guest@localhost:5672/";
}
Output:
Getting started with rabbitMQ - Msg0
Getting started with rabbitMQ - Msg1
Getting started with rabbitMQ - Msg2
Getting started with rabbitMQ - Msg3
You can also just run the MessageProducer first and then go the RabbitMQ management-UI and see if the Queue-1 persists the messages. Once the consumer receives the message, it will be deleted from the rabbitmq queue.
Ideally you should never send a message directly to a Queue, instead make use of Exchanges and Bindings. The above example is just for simplicity of learning.
Conclusion:
I have given you a high-level explanation of the different elements of an AMQP (RabbitMQ) messaging system. Exchanges and Bindings are discussed in the next article. We have also sent and received a message as an example.